Here’s the truth about your diet that you can’t – and mustn’t- overlook. Carbs are essential aspects too, but then carbs definitely need a refinement in the way we consume them. Or else, they’ll simply lead to consumption of excess, which in turn, leads to weight gain.
And most Indian households, more often than not, consume carbs three meals a day by virtue of Rotis. But how about Gud Roti. How about consuming meethi roti or sweet roti, as they say?
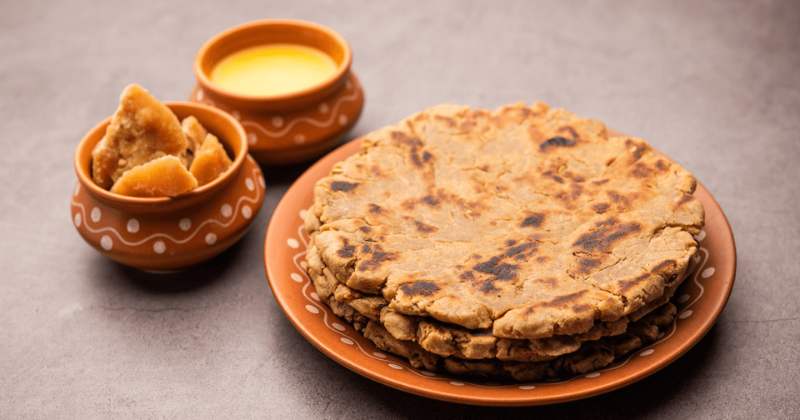
The jaggery roti, whether you’ve noticed or not, has in the past few years become part of the conscious eating dietary habits. Not only does the Gur ki Roti or Jaggery roti or Sweet roti provide a yummy reprieve in terms of taste, perhaps it’s healthier than you think.
Step-by-Step Guide: How to make Jaggery Roti or Gur ki Roti
Step 1:
For starters, you need to take some essential ingredients without which the sweet but healthy tasting Jaggery roti or sweet roti cannot be rendered complete. Take- whole wheel flour, jaggery, fennel seeds and ghee. This is, as one would say, your jaggery roti or gur ki roti starter pack.
Step 2:
For starters, take in a bowl, around ½ cup worth of jaggery powder and also take around ⅛ cup water (which is 2 tablespoons). However, you can even use grated jaggery instead of the jaggery powder at your disposal.
Step 3:
The next step is simple.
All you need to do is to mix them well and keep the mix aside for a period of upto 30 – 45 minutes. Another easy way to ensure this is to wait till the entire portion of dissolves.
Step 4:
Now, next up in order to prepare the Jaggery Roti or Gur roti, take another bowl or pan, in which you need to have around 1 to 1.25 cups of whole wheat flour, which is an essential ingredient. Additionally, add 1 teaspoon fennel seeds (saunf) and don’t forget a 1 tablespoon worth of ghee.
Furthermore, take maybe 2 tablespoons of desiccated coconut powder.
Step 5:
What you now need to do in order to prepare the jaggery roti or the gur ki roti as it’s called is to stir the jaggery solution and then by the help of a strainer- strain it into that very bowl that contains flour.
Step 6:
What to do next?
It is now that you begin to make a smooth dough. We all know how that is done and the preparation is simple. The dough will be slightly sticky but that’s because there’s already jaggery in it, which is the whole point.
Step 7:
Its stickiness is comparable to that of a cooked sugar or maybe, even jaggery syrup. You’ll notice that once you get down to preparing it.
Step 8:
What you need to do next is to make a simple observation. So if your dough looks wet, then you can add some more whole wheat flour and knead.
But be mindful of not adding too much water else it all gets soiled.
Step 9:
The next step, thereafter, is to find a zip lock bag. Most households already have won, but if you don’t, be sure you have it for making great Gur ki Roti or as it’s called, jaggery roti.
Step 10:
Next up please take a tiny sized plantain leaf. Now that ghee you have with you, must be spread on the zip lock bag.
Step 11:
Create a medium size ball from the dough, which will then interact with the zip lock bag. Here’s how. Place the ball from the dough and simply place it on top of the zip lock bag.
Cooking Gur ki roti on tawa
Step 12:
Take a medium sized ball from the dough and place it on the zip lock bag.
Now, the next big it easy. All you need to do is to gently remove the roti from the zip lock bag and what you now need to do is to only put it as gently as one can on a hot tawa, as that is where rotis are made at the end of the day, right?
Step 13:
But having said that, you must ensure that the tawa that’s on is on a low medium force. Now just start to roast the jaggery roti or gur kit roti.
Step 14:
Relax, the final flourish is just about to happen now.
Finally, all you need to do now is to gently remove the roti from that particular zip lock bag you had placed at a separate spot in the kitchen. Take it and now put it on the tawa. There you go- it’s all about to get ready for your massively interested taste buds.
Step 15:
Be sure of the fact that you’re keeping it the heat temperature on the tawa to low or at the most, low-medium.
Step 16:
Now just roast the jaggery roti more and turn it to both sides so that the gur ki roti has been roasted both ends.
Step 17:
What are you waiting for next? It’s done. See- good things come to those who persist and wait and there you have it. The taste of your patience has finally met its match.
Also Read: 5 Reasons to Replace Sugar with Natural Jaggery Powder Today